How to Photograph the Bioluminescence in Cape Town
Kyle GoetschThere’s something truly magical about seeing the ocean come alive with glowing blue light. The first time I photographed the bioluminescence along the Cape coastline, it felt otherworldly. The waves lit up like neon fire, leaving me in awe and scrambling to capture it before it faded.
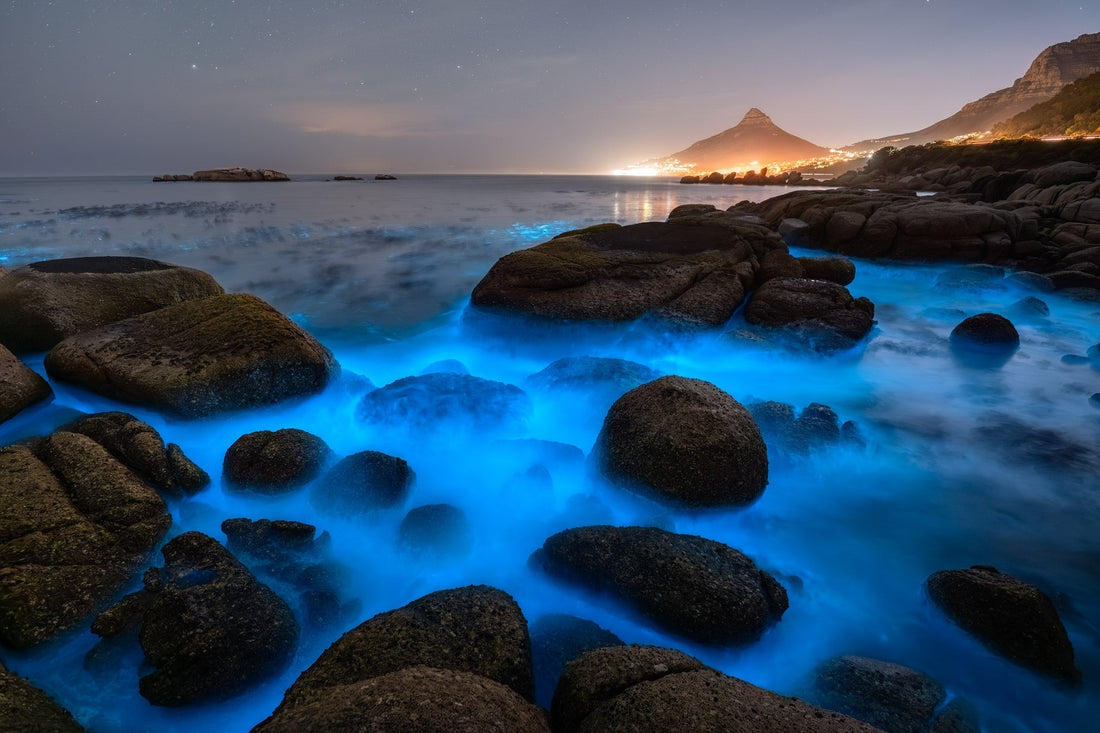
Over the years, I’ve been lucky enough to photograph it all along the peninsula, from Kogelbaai to Fish Hoek, Misty Cliffs and Hout Bay, and now for the first time towards Camps Bay side. Every sighting has felt unique. The glow, the conditions, even the shade of blue, always seem slightly different. It’s one of those natural events that never loses its sense of wonder.
 What is Bioluminescence?
Bioluminescence is caused by tiny organisms in the water called dinoflagellates. The species we see most often along the Cape coastline is Noctiluca scintillans. When disturbed by waves or movement, these microscopic organisms emit light as a defense mechanism, resulting in that bright electric-blue glow.
It’s most often seen during late summer and autumn when the water is warm and calm, but it can appear any time of year if conditions line up just right.

 How to Know When It Might Appear
The biggest challenge in photographing bioluminescence is simply finding it. It’s unpredictable, and sightings can last a few hours or continue for several nights in a row. There are a few clues that help improve your chances:
Look for red tide during the day. The same organisms that glow at night can sometimes tint the water reddish-brown in daylight. If you see that, it’s worth checking back after dark.
Watch for calm, warm weather. Still evenings after several warm days often create the ideal conditions for Noctiluca scintillans to gather near the surface.
Avoid bright moonlight. A moonless night will make the glow appear much stronger to the eye and camera.
Check social media. Sightings spread quickly once someone posts photos or video, so keeping an eye on local photography or surf groups can help.
But at the end of the day, the best way is simply to go look. Some of my favourite sightings happened after heading out with no guarantee, just a hunch and a bit of patience.
Remember that bioluminescence only becomes visible when the water is disturbed. It won’t glow if the sea is completely still. Look closely at the breaking waves, foam washing over rocks, or footprints in the wet sand. That’s where you’ll see the light start to appear.

Camera Gear and Setup
Photographing bioluminescence is similar to shooting the Milky Way. You’re working in very low light, so your setup needs to maximise sensitivity and stability.
Here’s what I use:
Camera: A full-frame body with strong low-light performance - I use a Nikon z6iii.
Lens: A wide-angle lens with a fast aperture (f/1.4–f/2.8) - I use either my Nikon 14-24mm f/2.8 or 20mm f/1.8 lenses.
Tripod: Absolutely essential - I use the leofoto 284c ranger
Remote shutter or timer: Prevents camera shake - I use a 2 second exposure delay.
A good starting point for settings:
Aperture: f/1.4–f/2.8
Shutter speed: 5–20 seconds, depending on wave speed and brightness
ISO: 1600–6400
Focus: Manual, set on a distant light or bright star before turning toward the ocean. If on rocks in front of you, use a flashlight to light rock and focus.
If the glow is strong and moving quickly, try shorter exposures around 3–6 seconds to preserve more texture in the waves. For faint glows or slower movement, longer exposures can help capture more light.
 Shooting Technique
Once you’re set up, slow down and observe the rhythm of the ocean. The glow often peaks as the wave crests and crashes, so timing your shutter just before impact will help capture the brightest moments.
If there’s glowing foam or footprints in the wet sand, include them as part of your composition. They add depth and give the viewer a sense of standing there in the moment.
A few composition ideas:
Silhouetted cliffs or rocks against the glowing sea
The Milky Way or stars overhead for a sense of scale
Reflections in wet sand or tidal pools
Bioluminescence can look faint to your eyes but appear bright in a long exposure. Take a few test shots, adjust your exposure, and trust your camera more than your eyesight.
 Editing Your Images
Editing bioluminescence photos is all about balance. You want to bring out the vivid blue tones without overdoing them. In Lightroom or Photoshop, I usually:
Cool down white balance (around 4000–4500K)
Lift shadows and blacks slightly to reveal more glow
Add gentle clarity and texture to define the wave edges
Reduce noise, especially in the sky
Keep the edit natural. The glow is already otherworldly, there’s no need to push the colors too far.
Patience and Luck
There’s no formula for finding bioluminescence. Some nights you drive home with an empty memory card. Other nights, the entire bay lights up and you can’t stop shooting. That unpredictability is part of what makes it so special.
When it happens, take a moment to stop shooting and just look. Watch the waves roll in, lighting up with every crash. It’s one of the rare natural displays that feels alive, fleeting, and deeply connected to the ocean itself.